As they say, 'a picture speaks a thousand words' so you want your blog pictures to make the right impression, especially to first time visitors.
Back when I started out as a nail blogger, my photography skills left a lot to be desired and my photos were undoubtedly giving off a dull impression. Fortunately since then I've picked up little bits of photography knowledge here and there and today my photos are looking pretty fly if I do say so myself! I get a lot of questions about my camera, lighting, set-up etc. so today I'm going to share everything I can think of that contributes to the final images you see in my posts.
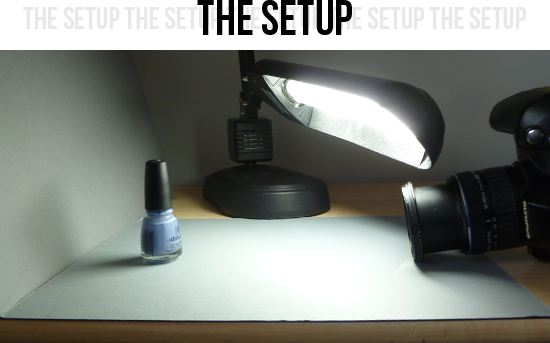
Camera: Olympus E510 w/ 14-42mm lens
Lamp: Plain old fluorescent desk lamp (£19.99 at Argos)
Background: Grey mount board (sold as scraps at local craft store)
I've got a very basic little setup going on at the end of my desk. For my background I use mount board, aka very thick card. I prop one piece of board up against the wall and set another on the surface.
My camera sits on its side (taking portrait photos) and I've found I get the best macro shots with the zoom at full and holding the camera further away. I normally rest the lamp on top of the lens.
I normally use my camera on the auto or macro setting but I always set the white balance.
I don't really know too much about the science behind this, I just know that setting the correct white balance will give you colours that are very true to real life which is obviously really important when swatching nail polish. If you want to read up, there's a good article at Cambridge in Colour.
The exact process varies depending on your camera but your instruction manual will tell you how to do it. You can either manually select your 'colour temperature' or set it according to your environment by pointing the camera at a sheet of white paper and letting the camera decide for you. Again, this is something to consult the manual about!
You may have noticed that I have a couple of go to 'hand poses'. I like to keep a bit of consistency running through my blog so I always aim to have 4-5 photos with the same set of poses in each nail art post. It's not as easy as it sounds, it's like yoga for your fingers! You have to practice to strike the same poses every time. This is why you don't see my right hand very often - my fingers just aren't as poseable on that hand!
At the moment, I'm using Adobe Photoshop CS5 to edit my photos and the process is very quick and simple. I just crop them down and add my watermark which I get to curve around my nail by using the 'Path' tool. There's a good video tutorial for using that function here which explains the process really well.
If you don't have Photoshop, GIMP is the next best thing that you can get for free!
You have read this articleTips and Tricks /
tutorial
with the title OH SNAP: How I Take My Pictures. You can bookmark this page URL http://nailsartideas.blogspot.com/2013/04/oh-snap-how-i-take-my-pictures.html?m=0. Thanks!
Write by:
Unknown - Sunday, April 14, 2013
.png)


Comments "OH SNAP: How I Take My Pictures"
Post a Comment